Enhance Productivity with Vim and Visual Studio Code
Before You Read
Though this post is written with macOS in mind, anyone should be able to benefit from it. With that said, all shortcuts and installation guides are geared towards macOS. Here is the list of keys that I will use later in this post for brevity:
⌘ command
⎋ escape (esc)
^ control
⌥ option (alt)
⇥ tab
⇧ shift
⇪ caps locks
↩ return (enter)
The What and The Why of Vim?
As a developer, I always look for shortcuts because switching between keyboard and mouse feels somewhat inefficient and slightly annoying. Fortunately, there are a few text editor programs that have mostly solved the problem, and Vim is a popular and beginner friendly option.
“Vim is a highly configurable text editor for efficiently creating and changing any kind of text” - Vim
By changing the way we interact with text, Vim allows both hands to always stay on the keyboard; that is, no mouse is needed while editing text. In the hand of a Vim wizard, magic can be pulled off.
With different modes, not only can Vim remove the need to reach for a mouse while editing text, but it also reduces the amount of movement of our fingers. There are three basic modes in Vim, which we will dive into shortly. Another reason to consider Vim is its ubiquity given that it is supported by most operating systems as well as many editors.
Why VSCode? Isn’t a Vim Good Enough?
Vim can be very powerful, but setting up debugging tools, syntax highlighting, intelligent code completion, snippets, and code refactoring is not an easy task, especially when we have to do all that for different languages and frameworks.
From my experience, VSCode Marketplace provides powerful extensions including Vim emulation, which can combine the power of this tool and the rich development experience of VSCode to make setup a snap.
To show how quick and easy it is to use let’s install and configure the Vim extension of Visual Studio Code:
1. Open Visual Studio Code
2. Go to Extensions (the highlighted tab on the left sidebar)
3. Search for “Vim”
4. Click & install the following plugin (personal recommendation)
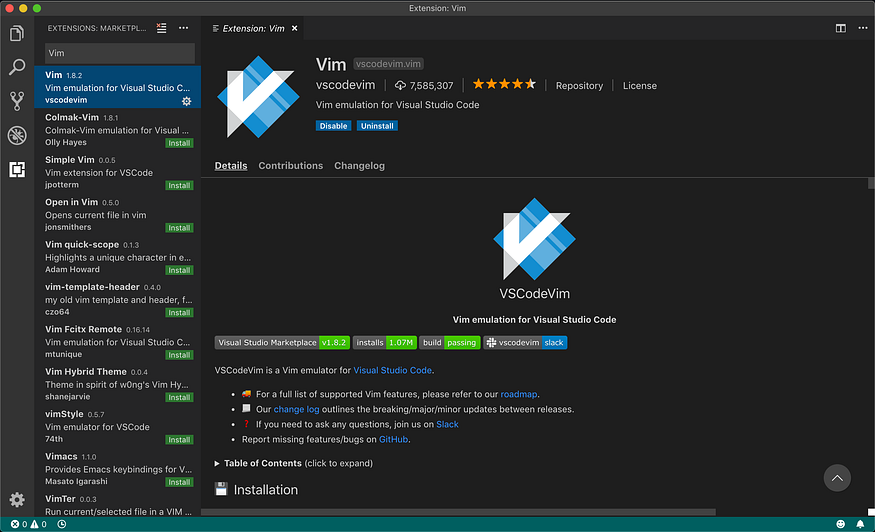
5. Go to VSCode Settings (by typing ⌘,)
6. Search for “Vim” in Settings
7. Customize Vim Extensions in the following steps (optional)
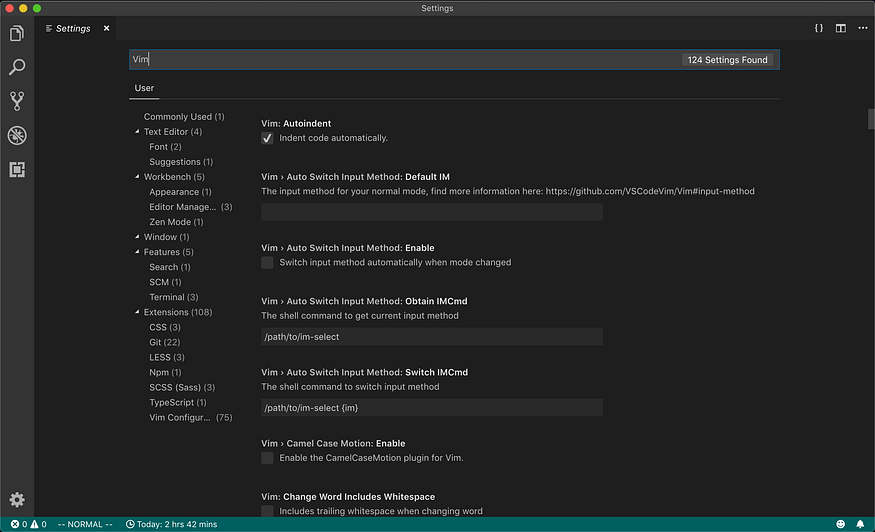
A couple of nice customization options:
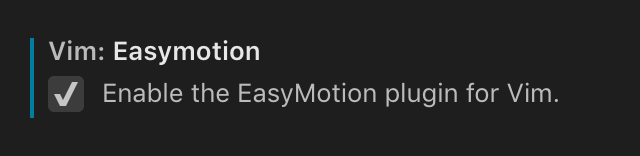
a) Vim Easymotion: Looking at this repo to learn more about the plugin.
b) Vim Sneak: Highly recommend this one for the ease of searching text in a file. We will discuss this plugin later in this post.

c) Vim Status Bar Control: Easy to tell which mode we are on

The Gist of Vim
Normal mode
Even though it is called “normal” mode, it is not normal, in my opinion. Nevertheless, this is the default mode when opening a Vim editor and the central mode of Vim since we are spending more time navigating and reading code rather than inserting text. In this mode, you can navigate through texts like a breeze without using a mouse or reaching to arrow keys. Here are some of the common navigation Vim tricks.
hjkl are the keys to replace arrow keys in normal mode. This way we can navigate without moving our fingers out of place (to the arrow keys).h ←j ↓k ↑l →
These are some basic motions that I usually use:w moves to the next word (or ⌥→ in VSCode)b moves to the previous word (or ⌥← in VSCode)gg moves to the top of the pageG moves to the bottom of the page0 moves to the beginning of a line$ moves to the end of a line{ moves to the previous paragraph} moves to the next paragraph^d moves down half a page^u moves up half a page
Counts: Using {count}{motion} to empower the above motions. For example, 2b means moving the cursor backward two words. Or moving up one page by typing 2^u would do the trick.{lineNumber}gg moves to a specific line
Operator: {operator}{count}{motion}. There are 3 common operators:c changey copyp paste
For instance, c5w would delete the next 5 words and enter insert mode. Another good one is typing ci” after moving the cursor between a pair of double quotes. That would delete everything between the double quotes and start insert mode.
Insert mode
Insert mode is the most straightforward one. This mode is probably what we are familiar with. It is the same mode that we use in a normal editor (VSCode, Atom, Sublime Text, or even Microsoft Word, etc.) to insert and delete our text. To switch to normal mode, type ⎋ or ⌃c.
The efficiency stems from switching from normal mode. All the following commands will switch our editor from normal mode to insert mode.i puts the insert cursor before the current charactera puts the insert cursor after the current characterI puts the insert cursor at the beginning of the lineA puts the insert cursor at the end of the line
Two commands that I find very useful are:o inserts a new line below and starts the cursor on that lineO inserts a new line above and starts the cursor on that line
Visual mode
This mode is also very simple. It assists in highlighting/selecting a text, which we usually perform with a mouse. To enter the visual mode, we can use these two basic commands:v starts highlighting a character at a timeV starts highlighting a line at a time
At first, people might argue that this is slower than a mouse. It’s not. It makes highlighting even faster and more precise by enabling highlighting to be used with any navigation keys in the normal mode. For instance, V} highlights everything from the current line to the end of the paragraph.
Some more Vim commands that I use
dd deletes the current lineyy copies the current linep pastes whatever we have deleted/copied in normal mode
Have you ever encountered a situation where your cursor is at the last line but it is on the top of the page? That means you can only see the last line.zz moves up half a page (but the cursor would stay on the same spot)
I recommended enabling Vim Sneak for a good reason:s{char1}{char2} jumps to the next word that starts with {char1}{char2} jumps to the previous word similarly.
S{char1}{char2}
This is a better way to navigate to a specific word compared to the built-in f{char} since two words enhance the precision. To move to the next occurrence, use semi-colon(;) and comma(,) for the previous one.
. repeats any previous command
With Vim Sneak, navigation becomes much more powerful; thus, our Vim command can be as complicated as vsco; which highlights everything from the current cursor to the second occurrence of a word that starts with co.
VSCode Shortcuts
There are ways to search and replace using Regular Expression using Vim. However, in my opinion, it is good enough to use the built-in search-replace functionality of VSCode using ⌘f for search and ⌘r for replacement.
To navigate between files, it is convenient to just use VSCode shortcuts.
^⇥ navigates to the most recently opened file
⇧^⇥ navigates to the least recently opened file
⌘p and type in the file’s name that we want to open or navigate to
⌘⇧f and type in a word or a Regular Expression to find the word in all files
Map ⇪ to ⎋ and/or ^
If you have tried Vim before, then you might have noticed that switching between modes (mostly between normal mode and insert mode) is a tyranny when having to reach to ⎋ or ^. Since ⇪ might not be used that much, mapping ⇪ to ⎋ or ^ is highly recommended by The Vim Community.
You might wonder: “Isn’t ⎋ enough to switch back to normal mode?”, “Why did I mention ^ for ^c?”, “Isn’t ^c more typing?”. Well, it is a controversial topic. Initially, I mapped ⇪ to ^ for a couple of reasons:
1. ^ is also hard to reach
2. I only use ⎋ for Vim and Vimium (a Chrome Extension that enables surfing the internet with Vim)
3. I use ^c or ^d for terminating a background thread or a running task in the terminal
4. I use ^ for a couple of shortcuts in VSCode and other applications
5. There are also a bunch of commands in Vim that need ^^d moves the cursor down half a page^u moves the cursor up half a page
Therefore, I’m happy with ⇪ is mapped to ^ if I have to choose one
Luckily, we don’t have to choose. We can map ⇪ to both ⎋ and ^ with Karabiner or Hammerspoon. Since we usually bind ^ with another key, it makes so much sense for these two libraries to map ⇪ to ⎋ for a single click and ⇪ to ^ for a hold. From my experience, Hammerspoon does its job.
Moving Forward
Hopefully, by now, you are sold on the fact that the combination of Vim and VSCode enhances your productivity and increases the comfortability of editing text. No one is expected to remember and apply all these commands after finishing reading this post for the first time. Vim has a decent learning curve, but don’t worry; it’s not that perplexing if you have VSCode.
If you are new to Vim, then you should start by avoiding using a cursor as much as possible. Using Vim with VSCode allows you to switch back to your mouse whenever you don’t feel like using Vim (please do). This can make the learning curve much more gentle for beginners. To learn even more about Vim, vimtutor is a great resource that can be easily accessed through the terminal.
If you are adept at Vim, you have my respect for making it all the way to the end. Please also share your tips & tricks for productivity so we can all learn! 😁

Acknowledgments
Last but not least, I must mention that my expertise with Vim is still developing. Only recently did I have the good fortune to discover the remarkable synergy between Visual Studio Code (VSCode) and Vim. This combination has offered an extraordinary experience.


Comments ()